

Welcome to Friday


I’ve been dying to make something from the Friday Pattern Co. not just because their patterns are for the modern woman, minimalist and beautiful, but also because they believe in doing good things and aren’t shy with saying so. They donate 5% of all proceeds to a rotating collection of charities in the world and even say which pattern is linked to which charity. In this case the Cambria Duster benefits the Innocence Project and I’m glad I bought this pattern.
Line drawing from Friday Pattern Co.
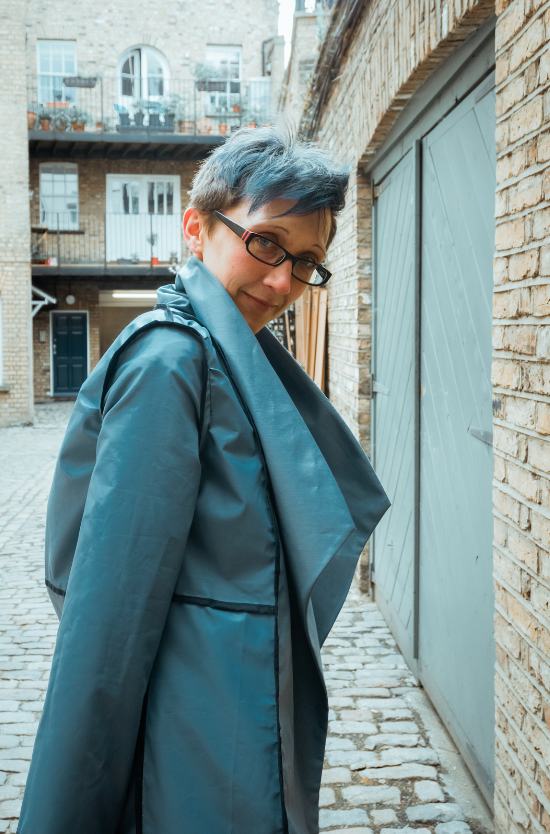
The Cambria Duster by FPC is a versatile and staple piece, and with its dramatic, wide draped shawl-style collar how could I resist. It is shin length and unlined which makes it perfect for layering. In addition there is a tie around the waist to provide clean and shapely lines or to add a little more coverage in the front.


When I saw this pattern, I knew immediately I had a fabric match with this light blue/slate grey waterproof covered fabric.The fabric isn’t fully waterproof but would definitely save the wearer from the odd light rain showers that us Londoners are always hit with. It is a bit of a surprise that I have such a light colour in my fabric collection, but I have been wanting to make something waterproof for a long while and even thought about the idea of buying pre-waxed fabric or waxing fabric myself. I bought 4 meters for a total of £10, and yes that is probably how I’ve managed to amass my collection over time. With the pattern suggesting that my make would be under 3 meters I knew that I would have plenty left over for something else.
Just looking through the instructions before I started this garment I wasn’t sure whether or not I wanted to line it, because I don’t like seeing unfinished edges of the insides of a garment. If I didn’t, then I would be looking at practising a lot of bias binding or trying out topstitching for the first time. Even if I lined the coat, I could still topstitch. So many options and I hadn’t even started making it!
Despite my fabric saying that it was waterproof, I had to check and spritzed it a couple of times with a water bottle. To my delight both sides were, but it made it even more difficult to work out which side was the right side. I was hoping that one side would be less waterproof than the other but neither gave any indications. On closer inspection the fabric appears to have one side where the weave is more pronounced and less on the other; I would even say that it appears to be quite similar to twill with both sides feeling quite soft to the touch. The main difference is that on the less pronounced side of weave it does have a slight shininess to it and reminds me of nylon; this is the side that I’ll be considering as the ‘wrong side’ of the fabric.


I cut a S size and the fabric was really easy to cut without fraying. The only adjustments I made whilst cutting out my patterns was to add 2 inches onto my sleeves. I really thought hard about keeping the outer pockets, usually I would of transferred them into the side seam but from the line drawing it looked like that’s where the ties would be attached from and I wanted to minimise any additional pull on those seams. So I kept the outer pockets and just added 3 inches to the bottom; I like deep pockets!

Looking regal
Eventually I decided that I would finish my raw edges by bias binding; thankfully my fabric didn’t easily fray nor did it have any additional stretch. Once I had decided I knew that this project was going to be all about the bias bound edges. I’ve only tried bias binding once, which you can read here in my attempt to make Schnittechen’s Trine Dress. Let’s just say it wasn’t my best attempt at it. For this I used Minerva’s cotton bias binding tape in navy blue 16mm. I wanted this detailing to make the garment stand out a little bit more and give it a more professional feel.

Trickiest step: line drawing
The trickiest step for me was the hardest part noted in the instructions, where the front and back piece meet going across the shoulder seams and around the neckline. Despite following the instructions I still ended up with puckering which I unpicked countless of times and eventually hand stitched together. If I had to make a duster again, I would definitely be looking to change the shape of the front piece from sharp right angles to something more curved.
This has been one of the most difficult projects for me, not because of the construction but the patience needed to follow through with my choice of bias binding all the raw edges. I can’t tell you how long the actual process took but the actual construction of the coat was perhaps only a couple of hours. There were one or two things that I changed, such as the lack of hemming of my sleeves as I didn’t own a colour of thread that matched the fabric. The sleeves were the only pattern pieces that had their raw edges bound before I stitched right sides together. This gave me the most out of my seam allowance to ease my sleeves onto the main garment. I had previously noticed with earlier edges that I was cutting away at least ½ of my seam allowance just to bind my edges. In hindsight, if I had found a matching colour thread it wouldn’t have really been an issue with trying to hide my seam and perhaps it could still have looked great if I didn’t hide the seam, regardless of the colour that it was.


If you don’t look too closely at my wonky stitching, in all honesty, I do think that the additional binding has made the guts of the coat look prettier than if I had just overlocked the edges. This coat has been such an involved piece that I would be more than happy to not look at another bias binding ever again. Well, maybe just for the next couple of projects. FPC has a link in the instructions for how to finish your seams but what I really found helpful was watching Lauren’s Ultimate Bias Binding part 2 video, where she takes you through a range of different ways that you can finish your seams. On the whole the instructions, including the images, were really clear and even came with a glossary, making this suitable for all levels including a confident beginner.


If you are looking to make something similar with waterproof fabric then I would recommend trying Minerva’s raincoat fabric that comes in a selection of printed patterns and a frosted clear version or Croft Mill’s waterproof and water repellent selection; their Cagoule Blue is a really close colour match to my own fabric. If you aren’t looking specifically for waterproof fabric then the possibilities are endless. Why not have a read of Montoya Mayo who lengthened hers or why not try cutting it short and finishing seams with flat felling like Casey Sibley has, the possibilities are endless.

