
A first of many Coats


Find the right outerwear and you’ll breeze through any season without compromising on style or comfort. With a long stretch of cold weather ahead, there’s never been a better time to consider my coat making options.
Just as we were ringing out the old year I completed my final 2018 resolution; a Sapporo Coat from Papercut Patterns.
The Sapporo Coat is a dramatic oversized coat that is fully lined and features cropped sleeves, tapered cuffs and hidden pockets in the front seams. Originally popular in the 60s mod look, oversized silhouettes have steadily been making a come back for the last couple of years. This year is no different, but with its dropped shoulders and soft shape the cocoon coat has taken on a more sophisticated look.


Following on from my sew frosting declaration, I decided to take on this pattern even though it’s not really a style that I go for. I saw this pattern as a gentle introduction to the world of coat making; with only 8 pattern pieces and limited seams what could possibly go wrong?

Papercut Pattern’s Sapporo Coat line drawing
At first glance, I was intrigued by the construction of the pattern but it didn’t give me the same level of excitement that it gave others. A good couple of months went by and I didn’t think about this pattern at all until I saw a listing for some grey 100% italian wool. I love it when you find THAT fabric for a specific pattern when you weren’t even looking for it, and suddenly it was on my list.
I bought 3m of the wool and was a little surprised when it arrived; it was thinner than what I was hoping for. But, as it was my first time sewing with wool, I didn’t want to spend a crazy amount of money. I was also concerned about the thickness of fabric that could be sewn on my machine.
Nothing could have prepared me for how oversized the coat was, despite having read quite a few reviews on the pattern. I cut the smallest size, an XXS, but it is still quite roomy. Even though this pattern is labeled for intermediate sewers, I think that any confident sewer could take this pattern on as it doesn’t include any fastenings such zips or buttons which could be tricky for a beginner.
As a first time coat maker there are quite a few things that I would change if I was to make this again. First up was the “built-in facings”. Maybe this would have worked with fabric that had more structure and weight than mine, but I would have prefered the facings at the front to have been separate pieces to create more stability. I also had some weird facing problems as I couldn’t tell the back of my fabric from the front and ended up sewing half the front the wrong way round.
Pressing seams; I never know when it comes to seams whether I should be pressing them open or pressing everything to the back. There were a few places in the instructions that could do with a few extra words on the topic. In the end I pressed open seams that I thought would have a lot of bulk, such as where the arm pieces met the body of the coat, while others I clipped and pressed towards the back.

I hate hand sewing with a passion - I really do lack the skill in keeping any of my stitches in a line, let alone a neat one. I should have ignored the instructions for leaving a gap in one of the side seams, as I could of bagged my lining through one of my very spacious sleeves. I ended up trying to slip stitch the lining but thankfully due to the dark thread my terrible hand sewing is lost in the material. Speaking of lining, I picked up 2m of a navy viscose voile, from Fabric Godmother’s black Friday sale, and it is just the softest. This was also a new type of fabric for me and even though it’s composition is 100% viscose, it is super lightweight and perfect for my coat.
There was no mention in the pattern about when or how I should finish my seams and I was worried about my lining fraying from the inside. Next time I would overlock all my pieces as soon as I cut them, as it did get a little tricky around the armhole due to all the fabric that I was constantly moving around.


This was my first time “bagging the lining” and even though my corners are a bit wonky I’m still pretty pleased with the finished garment. My only change was to put another pair of pockets to the side seams of the coat. This might have been a little excessive but due to the voluminous nature of the style I think that they are well hidden. As it lacks front fastenings I wouldn’t wear my coat at this time of the year, but it would be a great transitional piece for spring or autumn.


If this pattern still looks daunting to you, head over to Papercut’s Tutorials as they have a great walk through for this pattern.
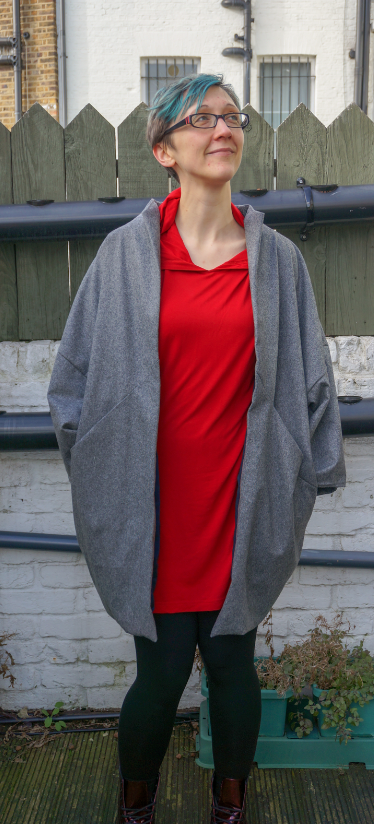


I’ve found that styling my Sapporo with a pair of minimal and fitted trousers works really well for a sophisticated look or even with jeans and trainers for a more laid-back look. The contrast of volumes makes for a statement look that will overcome any feelings of inelegance when buried under all of your winter layers.